Tanjore Painting:Complete Guide for Beginners
My first Tanjore painting was made when I was five months pregnant.
I had never attended a class. I had no formal training in this art form, no teacher walking me through the steps, no one to ask when something went wrong. What I had was an overwhelming fascination with this centuries-old art, a laptop full of open tabs, a stack of YouTube tutorials I had watched more times than I could count, and the particular kind of stubborn curiosity that makes you attempt things most people would consider slightly unreasonable.
I attempted it anyway. And somewhere between the gold leaf and the chalk powder and the very specific ratios I had scribbled in a notebook, something beautiful came together.
If you have ever seen a Tanjore painting, you understand the pull. The rich surface textures, the jewel tones, the gold that catches light from across a room. There is nothing quite like it. And if you have ever wondered whether you could make one yourself, the answer is yes. With patience, the right materials, and a process broken down clearly enough to follow, it is entirely within reach.
This is the guide.
What Is Tanjore Painting?
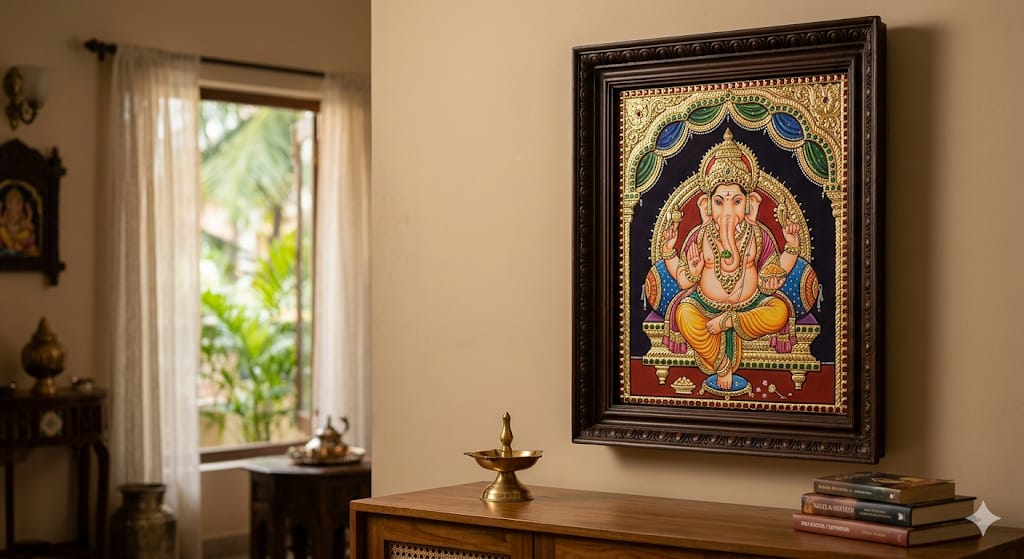
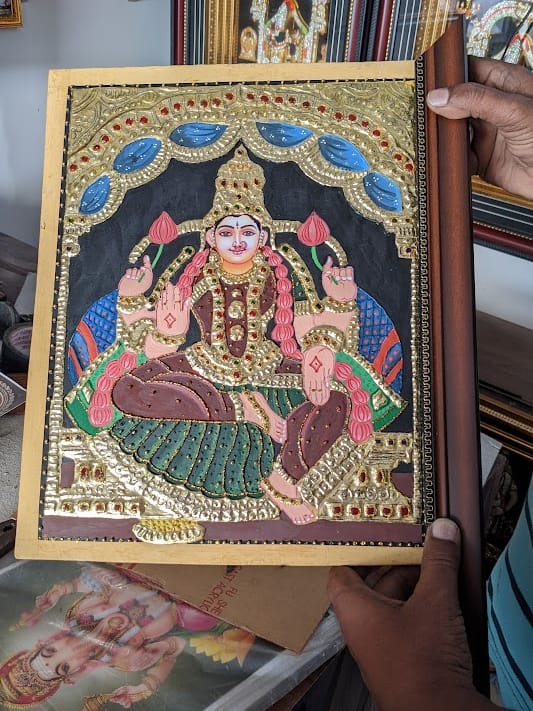
Tanjore painting is a classical South Indian art form originating in Thanjavur, a city in Tamil Nadu, India, dating back to around 1600 CE. It is one of the most distinctive painting traditions in the world, recognisable by three defining characteristics: rich surface texture created through embossing, vibrant jewel-toned colours, and gold leaf work that gives finished pieces their unmistakable luminosity.
Traditional subjects are devotional: Hindu deities and sacred figures depicted in a formal, still style that communicates reverence rather than action. The figures do not move. They are meant to be looked at slowly, the way you would look at something in a place of worship.
Over centuries, Tanjore painting has become both a revered art tradition and a widely sought-after decorative piece. Contemporary artists have expanded the subject matter beyond religious themes, but the technique itself has remained largely unchanged for four hundred years. Learning it connects you to something with real depth and history, which is part of what drew me to it.
What You Will Need: Materials for Tanjore Painting
Before you begin, gather your materials. This is where most beginners either overspend on things they do not need or underspend on things that actually matter.
The base Plywood in your chosen size. A good beginner size is 14 x 18 inches, manageable enough to complete without feeling overwhelming, but large enough to work with detail. Clean cotton cloth cut at least one inch wider on all sides than your plywood.
Canvas preparation: PVA craft glue (sold as Fevicol in India, widely available as craft glue or Mod Podge equivalent internationally), chalk powder, water, and fine sandpaper.
For the design transfer Yellow carbon paper to trace your chosen design onto the prepared surface.
Embossing and stone work, semi-precious stones or Kundan gems (decorative flat-backed gemstones available on Amazon and craft stores), Arabic gum (available at art supply shops and online), and a small piping cone or fine craft tool for detail work.
For the gold work, gold leaf sheets, PVA craft glue, a soft brush, and a fine pin or cotton swab for detail removal.
For painting Poster colours in your chosen palette. Traditional Tanjore paintings use deep, striking background colours: dark red, rich cobalt blue, or forest green, with brighter tones for the figures and gold for the decorative elements.
Step-by-Step Tanjore Painting Process
This is the foundation of everything. A poorly prepared canvas will show through in the finished painting, so take your time here.
Step One: Preparing the Canvas
- Cut your cotton cloth so it is at least one inch wider than your plywood on all four sides. If your board is 14 x 18 inches, your cloth should be at least 16 x 20 inches.
- Sand the edges of your plywood with sandpaper to soften any sharp corners that might cut through the cloth.
- Mix your first paste: Water and Fevicol in a 4:1 ratio. Submerge your cotton cloth in this mixture for a few minutes until it is fully saturated.
- Lay the wet cloth over the plywood. Pull the edges taut and fold them over the back, working out any wrinkles as you go. A smooth, wrinkle-free front surface is what you are aiming for. Paste the folded edges firmly to the back of the board using undiluted Fevicol.
- Mix your second paste: Chalk powder, water, and Fevicol in a 2:1:1 ratio. Using a flat brush, apply this mixture horizontally across the front of the canvas. Leave it to dry for ten to fifteen minutes, then apply a second coat vertically. This cross-application builds a smooth, even surface.
- Once completely dry, sand the surface gently with fine emery paper or sandpaper until it feels smooth to the touch. This is your painting surface.
This stage took me longer than I expected the first time. The drying between coats requires patience, and there is no shortcut. I remember sitting next to my canvas in the afternoon, willing it to dry faster. It does not work. Let it dry properly.
Step Two: Transferring Your Design
Choose your design before you begin the canvas preparation so you know exactly what size board you need. For beginners, a single central figure with a decorative border is the most manageable starting point.
Place your yellow carbon paper face down on the prepared canvas. Position your design on top and trace firmly with a pencil or stylus. The carbon transfers clearly onto the white chalk surface without bleeding or smudging.
Leave a margin on all four sides when positioning your design. This space is needed to accommodate the frame once the painting is complete. Trace all lines you will need: the figure, jewellery and accessories that will receive stone and gold work, border patterns, and any background design elements.
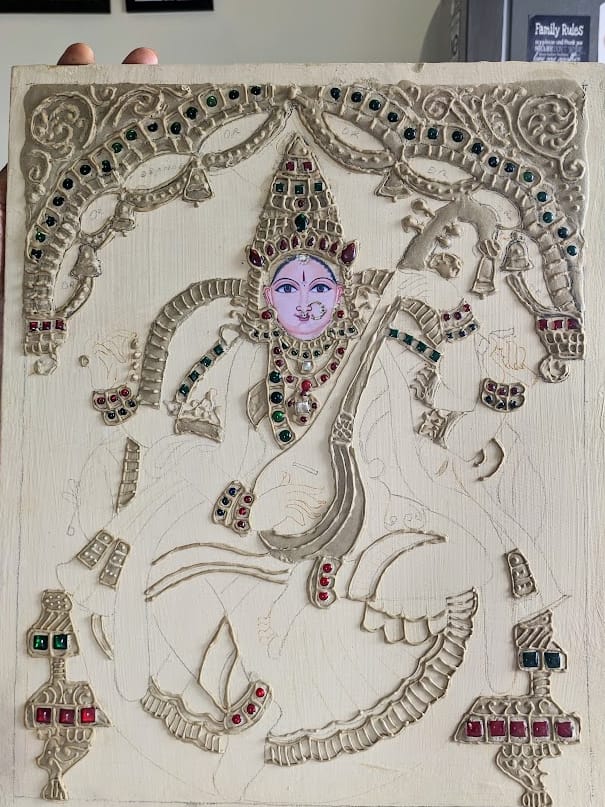
Step Three: Setting the Stones
This is the stage that gives Tanjore painting its three-dimensional quality, and it is more satisfying than it sounds.
Place your gems and decorative stones in the areas marked for jewellery and accessories. Attach them with a small amount of craft glue. Press gently and leave to set.
Mix your embossing paste: Arabic gum, chalk powder, and PVA glue in a 1:2:1 ratio. Apply a smooth layer over the stones and across any other areas to be embossed, border patterns, crowns, and decorative accessories. Leave to dry completely, then use a slightly damp cloth to clean any residue from the stone surfaces so they remain visible.
For cone work: Fill a small piping cone with a mixture of Arabic gum, chalk powder, and PVA glue in a 2:2:0.5 ratio. Use this to pipe fine decorative designs onto the borders and jewellery elements. This is the element that requires the most practice. Your first attempts will be less precise than later ones. That is normal.
My cone work on my first painting was, diplomatically speaking, enthusiastic rather than precise. It improved with each piece.
My cone work on my first painting was, diplomatically speaking, enthusiastic rather than precise. It improved with each piece.
Step Four: The Gold Work
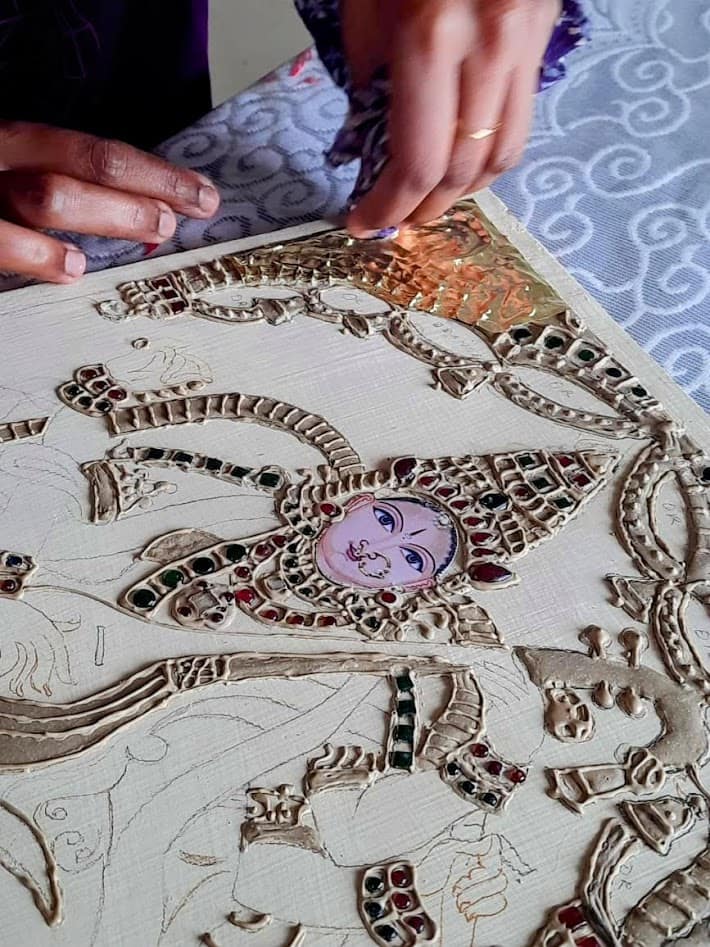
This is the stage most people are most nervous about and most surprised by. Gold leaf is more forgiving than it looks.
Cut your gold leaf sheets to roughly the size and shape of the areas you are covering. They do not need to be exact. Apply a thin layer of craft glue to the embossed area you are covering. Working in small sections: apply adhesive, lay the gold leaf, smooth it gently with a soft dry brush, and move to the next section.
Once the adhesive has set, trim away any excess gold leaf from the edges using a soft brush or your fingertip.
To remove gold leaf from stones: Apply a tiny amount of water to the centre of the stone with a fine brush or cotton swab. The moisture softens the gold. Use a pin very gently to ease the softened gold away from the stone surface, revealing the gem beneath. Work slowly and from the centre outward.
Step Five: Painting
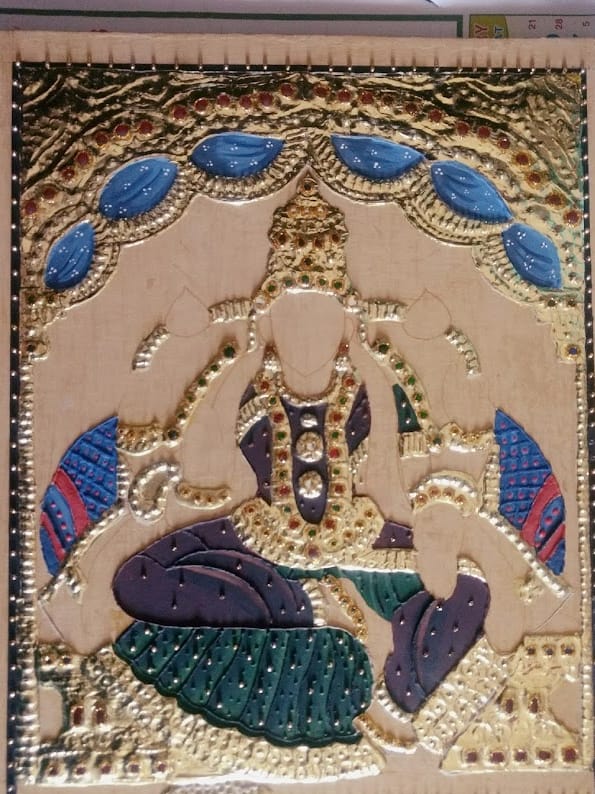
Traditional Tanjore style uses deep background colours: dark red, cobalt blue, or forest green. The background is painted first and painted flat. No shading, no blending. Tanjore painting is not about realism or depth through light and shadow. It is about presence and richness.
Paint the figures with care and precision. The faces in traditional Tanjore paintings are serene and formal: wide eyes, defined features, a stillness that is characteristic of the style. Work from background to foreground. Paint the background first, then larger figure elements, then details and facial features last.
The figures do not move. This is deliberate. There is no implied action, no dynamic pose. The stillness is the point and it is what gives the finished painting its meditative quality.
Take your time with this stage. The embossing and gold work underneath will show through and complement whatever colours you choose. Trust the process.
Framing Your Finished Tanjore Painting
Once completely dry, your painting is ready to frame. The margin you left on all four sides when transferring the design now accommodates the frame neatly.
A simple wooden frame in gold or dark wood suits the traditional aesthetic. Contemporary frames in black work well in modern interiors. The painting itself is the statement. The frame just needs to hold it.
A Few Things I Learned the Hard Way
The drying stages are not optional. Every stage has a drying time built in. Rushing any of them affects what follows. If the canvas is not fully dry before tracing, the carbon will smear. If the embossing paste is not set before you apply gold leaf, the texture will flatten. Patience is the main skill this art form teaches.
Your first cone work will be imperfect. Everyone’s is. The pressure required for fine lines is something your hand learns over time, not immediately.
Start smaller than you think you need. A 10 x 12 or 12 x 16 board is more manageable for a first attempt. You can always go larger once you understand how the materials behave.
Gold leaf is less fragile than it looks. Handle it with dry hands in a draft-free space and it behaves very cooperatively.
I made my first Tanjore painting five months pregnant, sitting on the floor of our spare room with materials spread around me and a tutorial playing on my laptop. It was slow, absorbing, and one of the most satisfying things I have ever made. I still have it.
If you have been curious about this art form, consider this your sign to try it. The process is methodical enough to learn from a guide, personal enough to make completely your own, and old enough to feel like it genuinely matters.
Check out the Tanjore painting materials available on Amazon:
Or, you can get materials online from these dealers as well :


You May Also Like
Top Kitchen Organisation Must-Haves for 2025

Efficient Storage Solutions for Every Room